fbpx
Clear Measure

REGISTER TODAY! WEBINAR: Conquer Causes of Slow Software Delivery

Octopus Deploy Lifecycles

How to Control Your Deployments with Octopus Deploy Lifecycles

Share This Article:

Octopus Deploy Lifecycles allow for a high level of control in deployments. Lifecycles specify rules for promotion between Environments, and retention policies to preserve release versions.

Lifecycles are applied to Projects. A Project can only be deployed to Environments specified in the assigned Lifecycle, and a Project can only have one Lifecycle. These limits restrict the Environments a Project can be deployed to allowing for granular deployment promotion control.

Deployment Promotion Control

One common use case for Lifecycles is to ensure an artifact is correctly promoted through pre-production environments. This is handled by configuring Lifecycles with rules that determine when and in what order an artifact can be deployed to an Environment.

Octopus Deploy lifecycles
Default Lifecycle deploying to Development, then Test, and finally Production Environments

Custom Octopus Deploy Lifecycles for Different Project Types

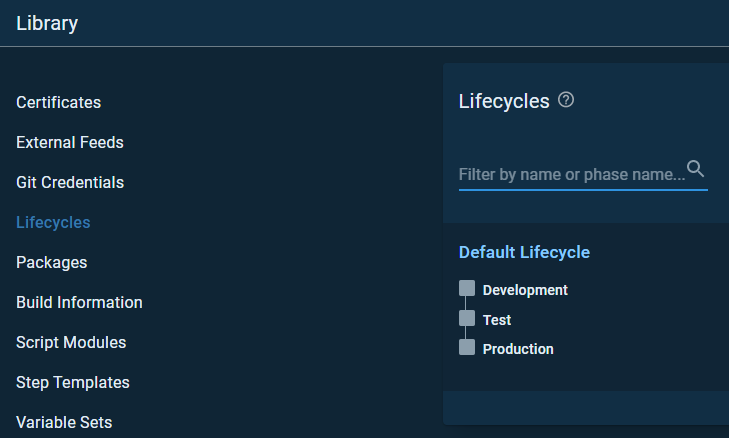
Every Space starts with one Lifecycle called “Default Lifecycle”. The Default Lifecycle will be automatically applied to every Project. This is sufficient when a single promotion process is needed for every Project. Sometimes there will be internal or support type apps that don’t need the full Project Lifecycle, however. The main project may need a Lifecycle like Development -> Test -> Acceptance -> Production to ensure quality releases for the customer base. An internal tool may not need the same level of quality assurance. A simpler Lifecycle such as Test -> Production will help minimize resources needed for simpler projects.

Creating a Lifecycle

Lifecycle configuration can be found in the Lifecycles page under the Library tab.

Octopus Deploy lifecycles
Lifecyles view

Click ‘Add Lifecycle’ to create a new Lifecycle.

Octopus Deploy lifecycles
New Lifecycle editing view

Enter a name, and if desired a description. Configure the retention policy as desired, then click ‘Save’ to save the newly created Lifecycle. At this point, the Lifecycle will deploy to all environments by default. It will be customized through Lifecycle Phases.

Octopus Deploy Lifecycle Phases

Phases are the deployment rules that the Lifecycle enforces on a Project. A Lifecycle can be customized by adding Phases. By default Lifecycles will deploy to all Environments. 

Customizing Lifecycle Phase

When editing an existing Lifecycle or creating a new one, select the ‘Add Phase’ button to create a new phase.

Octopus Deploy lifecycles
Editing view for Internal Tools Lifecycle

Enter a Phase name, and then select ‘Add Environment’ to specify which Environment(s) will be deployed to during this Phase. Environments can only be deployed to once. If no Environments are selected, the artifact will be deployed to every available environment simultaneously.

When selecting an Environment, options will be provided to deploy automatically, or manually. Manual is the default and requires a user to click a ‘Deploy’ button, whereas automatic will deploy to the specified Environment when that Phase has been reached.

The ‘Required to progress’ options allow customization within a Phase. If deploying to multiple Environments, these options can let the process continue even if only some of the deployments are successful. The ‘Optional phase’ option will run the Phase during the deploy process, but will continue even if the Phase fails.

Octopus Deploy lifecycles
Phase editing view

Repeat the process to add more Phases.

Octopus Deploy lifecycles
Internal Tools Lifecycle with Test and Production phases

Click ‘Save’ when finished to preserve the changes. The updated Lifecycle will now show the phases in the Lifecycles page

Octopus Deploy lifecycles
Lifecycles page with completed Internal Tools Lifecycle

Octopus Deploy Lifecycles Protip: Sandbox

The simplest way to fully learn about Octopus Deploy is to create a sandbox instance in Azure. You can quickly create a full Octopus instance from the Azure marketplace.

1) Search for Octopus Deploy in the Marketplace as shown in the picture below.

2) Fill out the wizard and create an Octopus Deploy instance.

It will take about 5 minutes to complete the form and then about 10 more for the resources to be automatically generated in Azure.

Azure Marketplace with Octopus Deploy resource

Related Articles

Need Help with an Upcoming Project

Terms of Use | Privacy Policy | Cookies Policy

Copyright © Clear Measure. All rights reserved.